
Try these recipes taken from Ella Risbridger's wonderful Midnight Chicken.
Imperfect Pikelets
Pikelets are like crumpets, but untidy. Pikelets shouldn’t be perfect or precise. In fact, with pikelets every imperfection is proof that you did it all by yourself. I love recipes like this. There’s something brilliant about a recipe that doesn’t ask too much of you; a recipe, in fact, where getting it exactly right would be exactly wrong; a recipe you can fiddle with, and tend to when you remember. The bicarb here gives both a slight sour tang, and a gentle rise; it’s not in all pikelet recipes, but I really like it. If you’re on your own, I suggest you make the full quantity anyway. The cooked pikelets will be fine in an airtight container for a few days, and you can toast them in a regular toaster without hassle. I confess I have never been able to keep pikelets in the house without eating them for longer than about four days, so I don’t know how well they keep past that...
 For 4
For 4
• 175g plain flour
• 1 x 7g sachet instant yeast
• 1/2 tsp caster sugar
• 1/2 tsp fine salt
• 1/2 tsp bicarbonate of soda
• 150ml milk
• 150ml hot water
• Oil, for frying (if your frying pan isn’t non-stick)
• Butter and jam, Marmite or strong Cheddar, to serve
1. So. Breakfast. You get up, and put the kettle on for tea. While the kettle’s boiling, you measure everything out: dry ingredients into a big bowl, and milk into a jug. When the kettle boils, pour 150ml hot water into the jug with the milk (and the rest into the teapot). Stir to a sort of baby’s bath temperature, so it feels pleasant on the back of your hand, neither too cold nor too hot – and when it gets there (no hotter, please), pour it into the bowl with the dry ingredients.
2. Now whisk like billy-o. Keep whisking: 3–4 minutes of whisking with your whole strength. Come on, you’ll get an hour to rest in a minute…This puts the holes in the pikelet, which sounds like an old-fashioned idiom for breaking something (‘By Jove, that’s put the holes in the pikelet!’) but isn’t: the bubbles of air you’re beating into the mixture become the holes when you griddle it.
3. Cover the bowl with a clean tea towel, and take your tea back to bed.
4. After an hour or so (it’ll stand a little bit longer, so don’t worry if you’re at a good bit of your book, or otherwise occupied), come back and check the mixture. It should be bubbly and frothy and about half as big again as when you left it. Stick your largest frying pan over a medium heat, adding a drizzle of oil if your pan’s not non-stick.
5. Get someone else to put butter and jam on the table, or butter and Marmite, or thin potato-peeler strips of cheese.
6. Take a tablespoonful of your batter and dollop it into the hot pan. Repeat a couple more times, depending on the size of your pan; leave some space in-between for the pikelets to spread out. Cook for about 90 seconds, then flip over with a spatula and give them another 60 seconds.
7. If you are using an AGA, either use the large AGA frying pan or take a piece of kitchen paper and drizzle some oil onto it then wipe over the simmering plate and cook the pikelets directly onto the surface of the plate.
8. Use said spatula to lift your pikelets out onto a plate. Drape immediately with cheese, or a hunk of best butter as thick as a thumb.
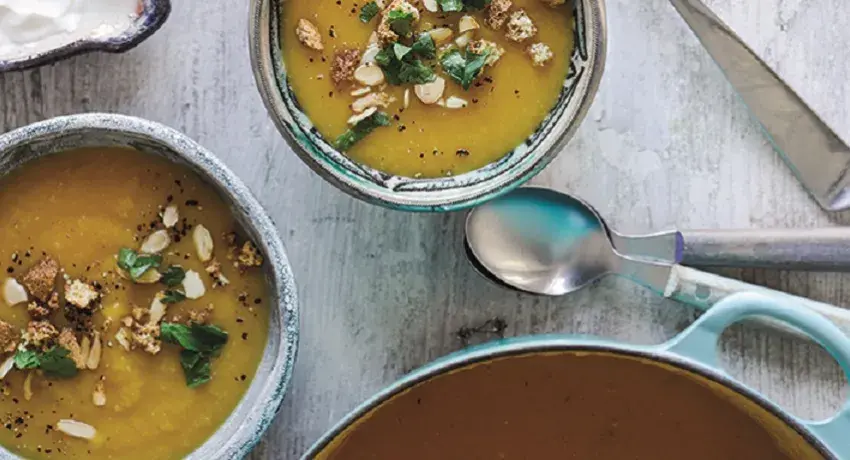
Tipsy Amaretto Squash Soup
There’s this restaurant just down the street from where we live, and they make these little puffed balls of pasta stuffed with sweet, subtle pumpkin and cream, and drizzled with amaretto: I have almost never eaten anything so lovely. I’m not sure what the dish is called, or even if it has a proper name, but it’s perfect. This soup is like that, sort of. It’s incredibly simple, because it all virtually takes care of itself. It’s the kind of cooking that occupies a Saturday afternoon like nothing else – a gentle, low-level faff that occupies the hands and mind. And the result is the kind of Saturday supper that makes the heart rejoice.
For 4
• 1 butternut squash, about 1kg (or 2 x 500g bags pre-chopped) 
• 2 tbsp amaretto
• 11/2 tbsp olive oil
• 1/2 nutmeg
• 6 shallots
• 4 garlic cloves
• 1 celery stalk
• 1 tsp butter
• 500ml chicken or vegetable stock (or a stock pot/cube diluted with 500ml boiling water)
• 2 tsp flaked almonds
• 4 tsp labneh, yoghurt or cream
• 4 amaretti biscuits
• 1 tbsp finely chopped parsley
• Black pepper
Pre-heat your oven to 200°C. Find a roasting tin, ideally one you can set on the hob, to save on the washing up.
1. If you’re using a whole squash use a big knife to peel it, because a peeler won’t take off enough of the white pithy stuff just under the skin. De-seed it; chop the squash into chunks and put in the tin. Drizzle with the amaretto and 1 tablespoon of the olive oil, then grind over lots of black pepper and finely grate in the nutmeg. Turn it all about with your hands, so that everything is nicely coated. The squash will take about 35–45 minutes to roast, depending on how small you chopped it. This gives you plenty of time to finely chop the shallots, garlic and celery.
2. With an AGA, roast the prepared squash in the roasting oven, using the roasting tin for about 35 minutes, then check it is soft and tender. Transfer to a large AGA saucepan.
3. After 35 minutes, fetch your squash from the oven and pierce it with a fork; it should be soft and tender. If not, don’t worry: just give it another 10 minutes.
4. When the squash is cooked, sit the tin with everything in it over a low heat. (If you don’t have a roasting tin that will go on the hob, you can transfer the lot to a heavy-based saucepan for this bit.) Add the butter and the rest of the olive oil (the oil stops the butter from scorching), along with the shallots, garlic and celery. Cook, giving it a stir now and then, for about 20 minutes or until everything is soft. Turn off the heat.
5. For an AGA bring the squash, butter, rest of the olive oil, shallots, garlic and celery to the boil and then place in the simmering oven for about 30 minutes until everything is soft. Remove from the oven. (Naturally if you have one of the latest generation of AGA, with an independently heated simmering plate, this can be done on the top).
6. Have your stock made up in a jug at the side, still hot. Take your hand blender, and blitz everything in the tin. Very slowly drizzle in the stock and keep blitzing until smooth. Taste for salt and add some if you think it needs it, and perhaps another quick grating of nutmeg and a twist of pepper. Turn the heat back on low and let the soup simmer gently, or AGA owners place the saucepan back into the simmering oven, while you toast the flaked almonds in a dry frying pan over a medium heat, or simmering plate, shaking the pan until they turn gold.
7. Ladle into bowls and swirl through the labneh, yoghurt or cream. Scatter over the almonds and the crumbled amaretti, and the parsley, for a pop of green, then serve. Curl up; enjoy.
Trashy Ginger Beer Chicken
The heart wants what the heart wants, and sometimes what my heart wants is this: sticky, trashy, salty-sweet chicken drumsticks, eaten with the hands, covering everything they touch with their gloriously unpretentious sauce. This is miracle chicken, and it tastes as if you couldn’t possibly have made it from
scratch: it tastes like you got it from some food truck, or some old man barbecuing on an American street corner, or somewhere else dirty and delicious and real. This is proper grubby food, only made with ingredients that (whisper it) aren’t really terribly bad for you. This tastes like it ought to be a guilty pleasure, if I believed in those (I don’t). It tastes like an absolute scandal. Serve this with a very crisp green salad dressed, if at all, with just bright lemon and flaky sea salt. Maybe a bit of bread to dredge the plates. Nothing else, except hundreds of napkins. Paper napkins. Paper plates. Don’t try and gussy this up. This is what it is: the kind of chicken that makes you want to lick the plate.
For 4
 • 60ml ginger beer
• 30ml light soy sauce
• 2 tsp chilli flakes
• 1/2 tbsp miso paste
• 100g fresh ginger
• 6 garlic cloves
• 1kg chicken thighs or drumsticks (drumsticks are easier to eat, thighs have better flavour)
• 1 tbsp sesame seeds (optional)
• Flaky sea salt (optional)
1. In your biggest bowl, whisk together the ginger beer, soy sauce, chilli flakes and miso paste. Peel the ginger and grate it finely, straight into the bowl; do the same with the garlic. The gnarly end bits from the grating can go in too. Stir everything together. Chuck the chicken into the bowl, and stir well, turning the chicken over and over in the marinade to make sure it’s properly coated. Cover and leave in the fridge for about an hour, maybe a couple if you can. I do this mostly as a weeknight dinner and usually only have an hour, or even half an hour, to let it marinate: that’s okay, too.
2. About an hour before you want to eat, pre-heat your oven to 200°C.
3. Pack the marinated chicken into a roasting tin, skin side down, and pour over a tablespoon of the marinade – I like to get plenty of the grated ginger and garlic in there as well.
4. Put the chicken in the oven and cook it for about 45 minutes in total. For an AGA, place the tin into the roasting oven on the oven grid shelf placed on the floor of the oven. After 10 minutes, pour over another tablespoon of the marinade. After another 10 minutes, do the same, turning the chicken over, so it’s skin side up. Tongs are useful here. Sprinkle over a tablespoon of sesame seeds, if liked (my favourite cookery book directive), and perhaps a few flakes of sea salt. Be careful, though, because of the saltiness of the soy sauce and the miso. Cook the chicken for a final 25 minutes. Don’t be tempted to baste the chicken with any more marinade after this, as it has been in contact with raw chicken and so needs at least 20 minutes in a hot oven.
5. Either use a meat thermometer to check if the chicken is cooked or pierce the thickest bit with a skewer – if the juices that bubble up are clear (not pink), you’re good to go.
Squash Skillet Pie
I do not have many principles, as a cook, but chief among those I do have is this: I will go to the wall for pre-prepared ingredients. Cooking is not a contest or a virtue test, and it is not only for those with plenty of time. Cooking is for everyone, or it should be. And anything that makes that more likely (prechopped vegetables, ready-rolled pastry, a stock cube or pot) is to be applauded. You can’t always do everything, and you should know that even people who make a living from cooking do not always start from scratch. Prepping is work, and it takes physical strength sometimes, and mental strength sometimes, and energy always, and if it’s easier on you to buy pre-prepared ingredients, do it. Consider this permission, if you need it. You do whatever you need to look after yourself. This does not make you any less of a cook. This does not make the success of your meal any less your success. Carl Sagan once said that you couldn’t make an apple pie from scratch unless you first invented the universe: all you’re doing is starting a little further down the road than most. There is no shame at all in buying pre-rolled puff pastry. I have never met anyone who made their own puff pastry, and if I did I’d wonder (with more than a touch of envy, obviously) if they didn’t have anything better to do. There is no shame in buying cooked chickpeas: you can’t always know exactly what you’re going to eat twenty-four hours in advance. And there is no shame in buying pre-diced squash: chopping squash is hard, especially if you have shaky hands. This pie is made with ready-rolled pastry, pre-chopped squash and tinned chickpeas, and it’s brilliant. Really. It’s one of my favourite meals in the world – and with a glass of cold white wine and a crisp salad (or some petit pois), it’s even better.
For 4
• 2 red onions
• 4 garlic cloves
• 1 tsp butter
• 1 tsp olive oil
• 540g pre-chopped squash (that’s 2 bags of the stuff from the supermarket – sometimes it has sweet potato in it too, and that’s fine)
• 1 tsp black pepper
• 2 good gratings of nutmeg (or 1 tsp ground)
• 3 stalks of fresh thyme (or 1 tsp dried)
• Little glass of dry white wine
• 1 x 400g tin of chickpeas
• 50g Parmesan
• 1 egg
• 100ml double cream
• 1 x 320g packet of pre-rolled chilled puff pastry
• Flaky sea salt
• Salad, to serve
1. Slice your onions and chop your garlic. Grab a cast-iron skillet or ovenproof frying pan (mine is 26cm across), and set it over a medium-low heat, or the AGA simmering plate. Add the butter and oil, and your onions and garlic. Cook for 15 minutes, stirring every so often until the onions are all beautiful and tangly, then chuck in your squash.
2. Let the squash sear against the hot skillet for a minute or two, and then, working fast, add the pepper, nutmeg, the leaves from two of the thyme stalks (if you’re using dried thyme, add it all now) and the white wine. Cover immediately with a lid or foil, then turn the heat down to low and leave the squash to cook for 20 minutes. 2, 3, 4 and 5 oven AGA: After adding the squash, pepper, nutmeg and white wine bring to the boil, put on the lid and place in the simmering oven for 20-30 minutes.
3. Meanwhile, open the tin of chickpeas, rinse in a colander and leave them to drain in the sink. Grate your Parmesan (unless you’ve bought pre-grated, which is – say it with me – also fine) and beat your egg.
4. Take the lid or foil off your squash, and taste: it should be tender and lovely. Add the chickpeas, Parmesan and cream. Give it a good stir, and taste again: add salt if it needs it, and maybe more pepper. Remove from the heat and let it cool for 10 minutes.
5. Pre-heat your oven to 180°C. Unroll your pastry on a sheet of baking paper, and cut out a circle slightly bigger than your skillet – I use a dinner plate for this, as a template. Using the baking paper to help you lift it, slide the pastry lid over the top of the squash, then carefully use a fork to seal the edges of the pastry against the sides of the skillet. Prick a hole with the fork in the centre of the pastry lid, then brush with beaten egg and scatter with sea salt and the leaves from the remaining thyme stalk.Transfer the skillet to the oven and bake for 15 minutes, or until the pastry is golden and glossy. 2, 3, 4 and 5 oven AGA: Slide the pan into the roasting oven on the oven grid shelf set on the floor of the oven and bake for about 15 minutes, or until the pastry is golden and glossy.
6. A trivet on the table. Get someone else to pour the wine, put out knives and forks, and maybe make a salad. (I mean, empty a bag of leaves into a bowl.) Maybe light a candle. Take the skillet to the table – be very careful around the skillet, as it will be hot – and let people serve themselves, chinking glasses in the candlelight.
Whiskey & Rye Blondies
We climbed the hill together: the Tall Man and me, Harry Harris and his girlfriend, and Fiona, our token American, in pristine wellies. It was dark. It was Bonfire Night, and we were going to watch London burn. We had a picnic: a midnight picnic, for eating in the cold and the dark, our mittens tinged with smoke. We had acquired some mulled wine from a pub on the way up, and decanted it. We had samosas, ineptly folded, but spicy and strong. Tiny hand pies. Blondies, studded with sea salt, and crisp, half-melted sugar, still warm. We had sparklers, matches and good boots. Scarves and gloves. The Tall Man had a bottle of ginger wine in his pocket. I think it was Fiona’s first Bonfire Night, although I am not sure. People were singing ‘American Pie’ as we climbed the hill, and I had been thinking of the same song earlier when I was baking these blondies: dense rye crust, and the sharp-sour tang of whiskey in among the sweet white chocolate. ‘So… it’s to burn the Catholics?’ Fiona asked, and we sort of shrugged, silhouetted against the city lights. Kind of? Maybe? Not at all, once you get right down to it: it’s about fire, really, like every other festival that comes to hold back the dark. We lit our sparklers, and wrote our names in fire, as we always have, and always will. I wrote our initials entwined in a heart. The afterimage stayed on my retinas for a long time, and I felt like a teenager. Flippant, silly, dangerous, with everything mine for the taking: the whole world bright at my feet, bright with fire. Then there was an enormous bang, close by: the real teenagers had sent an illegal roman candle into the hedgerow. The police came swiftly, and in the shadows cast by their blue lights, so clean and so ordinary, we slinked away, down the hill, through the long grass, and surreptitiously ate our blondies in the pub. They were (and are) so good: toffee-ish, a little blackened at the edges, dense and fudgy inside, with a crackled sugary crust. Sea salt. Whiskey and rye. The gold sugar stars caught on my teeth. I leaned against the Tall Man, breathed in the smoke from his coat, closed my eyes and wished it would last forever.
Makes 24 blondies
 • 200g unsalted butter, plus extra for greasing
• 200g golden caster sugar
• 200g molasses sugar
• 2 tbsp whiskey (if you don’t like whiskey, just leave it out and add an extra teaspoon of vanilla extract)
• 1 tsp vanilla extract
• 2 large eggs
• 250g rye flour
• 150g white chocolate
• 2 tsp flaky sea salt
• 2 tsp ‘golden stars’ sugar decorations (optional, but you can get them from most major supermarkets, in the baking aisle)
1. Pre-heat your oven to 180°C and butter a brownie tin (about 30cm x 20cm) or other similar-sized tin, such as the AGA traybake tin, lined with Bake-O-Glide.
2. Weigh the butter into a large saucepan, and set it over the lowest possible heat, AGA owners use the simmering plate. You’re going to melt it, then brown it, and this will take about 7 minutes: keep an eye on it. It will go through solid to liquid to foaming to rising to sinking back on itself, and you will be able to see the colour change.
3. Meanwhile, weigh out your sugars separately. (You can tinker with these a bit, as long as you keep some dark sugar in there. Molasses sugar is splendid, but can be hard to find; using demerara instead will give you a lovely, paler blondie, while substituting the golden caster sugar with granulated can make the crust even crunchier, with that classic crackled finish.)
4. When the butter is a nut-brown colour, add your sugars to the pan: golden caster first, and then molasses. Whisk with all your strength to dissolve the sugar, and simmer over a low heat for about a minute. Add the whiskey and/or vanilla, and whisk until you have a smooth, glossy, dark mixture. Remove from the heat and leave to cool for 5 minutes.
5. Crack both eggs into the cooled butter and sugar mixture, and take up your whisk again. Keep whisking until the eggs are thoroughly incorporated, then gently fold in the rye flour; you can do this with the whisk too, just go gently.
6. Break up your white chocolate into little pieces or shred it with a big knife or cleaver. Quickly stir the chocolate through the blondie batter, not minding too much if it melts, then decant into the buttered (or Bake-OGlide lined) tin, squidging it down into the corners. Scatter with the sea salt – and the gold sugar stars, if using.
7. Bake for 25 minutes, then leave to cool completely in the tin. Score into 24 small squares: these are very sweet and very rich, which is why they are so good on a cold night. If you can, store in their tin, as they stay fudgier that way – just cover with foil, and lever out as needed. Or lever out half a dozen and wrap in foil, then take them up the hill to see the fireworks and the stars. 3, 4 and 5 oven AGA: Cook in the baking oven, slide the tin onto the lowest set of runners, for about 20-25 minutes. 2 oven AGA: Slide the tin onto the lowest set of runners in the roasting oven with the cold plain shelf slid above on the third runners down and bake for 20-25 minutes. A
Read our interview with Ella Risbridger.


